3D Printing and DIY Electronics: The End of Ill-Fitting Enclosures
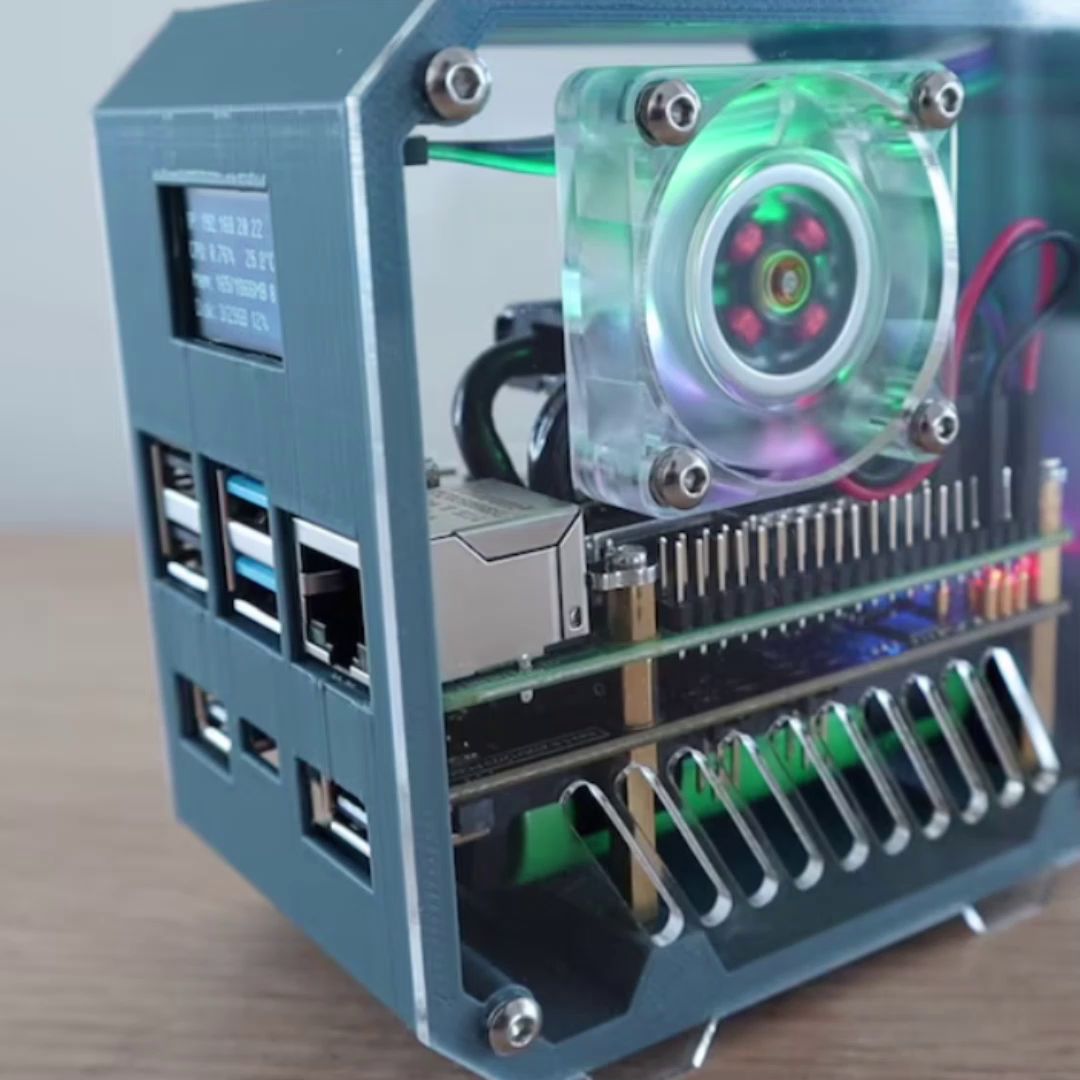
For any electronics or programming enthusiast, assembling an Arduino or Raspberry Pi project often leads to a frustrating moment: finding the ideal enclosure. Generic plastic boxes are rarely suitable, and commercial enclosures are often expensive or lack specific features (precise ventilation holes, motherboard supports, port access).
3D printing has revolutionized this field by enabling the creation of custom enclosures that are perfectly fitted, transforming the finishing phase—once a headache—into a step of creative and precise design.

1. Why 3D Printing Is Essential for DIY Electronics
3D printing offers direct solutions to problems posed by standard electronic enclosure design:
- Perfect Fit (Snap-Fit): No more glue or screws for every part. 3D printing allows you to design precise closing mechanisms (clips, hinges, slides) that fit together perfectly right out of the printer.
- Optimal Integration: Enclosures can be designed with integrated supports for motherboards (Raspberry Pi, Arduino Uno), channels for cable routing, or slots for LCD screens, fans, and batteries, eliminating internal clutter.
- Protection and Ventilation: It's easy to integrate custom ventilation grilles that maximize cooling without sacrificing protection against dust or humidity.
2. The Workflow: From Concept to Motherboard
Creating a custom enclosure is a simple and iterative process, accessible even to beginners in 3D modeling.
Step 1: The Virtual Model of the Board
To ensure a perfect fit, the first step is to obtain the precise 3D model of the electronic board you want to house.
- Online Libraries: Most popular boards (Raspberry Pi, Arduino) have STEP or STL models available for free online, often provided by manufacturers or the community. These files serve as the foundation to guarantee exact dimensions of mounting holes and ports.
Step 2: Enclosure Modeling
Use CAD (Computer-Aided Design) software to design the outer shell.
- Tool Choices: Free tools like Fusion (for parametric design) or Tinkercad (for beginners) are ideal.
- Offset Technique: For fit, always use tolerance. If the board measures on each side, plan an interior space of or in the enclosure. This margin of is necessary to compensate for filament expansion during printing and ensure a snug fit without forcing.
Step 3: Iteration and Testing
The beauty of 3D printing lies in rapid testing. Print small samples (just the screw mounting area or the clip area) before printing the full enclosure. This allows you to validate the fit in minutes and save filament.
3. Material Selection: Insulate and Protect
Your filament choice should be guided by your electronics requirements:
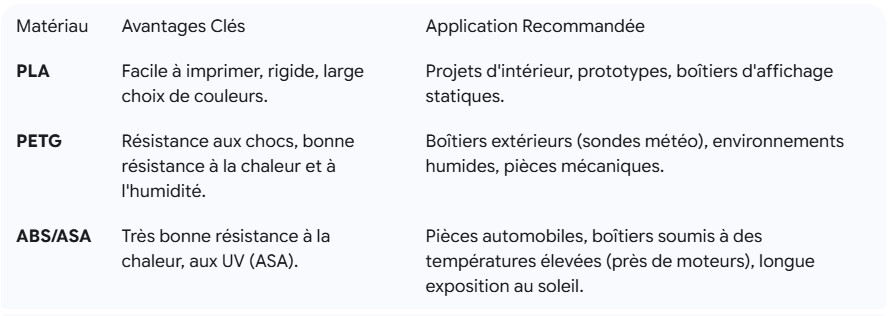
Thermal Safety: If your build (mini computer, power circuit) generates heat, opt for PETG or ASA and make sure to design openings or grilles for heat dissipation.
3D printing transforms DIY electronics, allowing you to give your creations a professional, ergonomic finish that is perfectly adapted to your needs, without relying on standard enclosure solutions.